
Streaming television and on‑demand content through IPTV and M3U playlists has become increasingly popular. Whether you’re watching sports, movies, or live channels, nothing disrupts the experience faster than audio that doesn’t match the video. If you use VLC media player to open M3U playlists, you may occasionally encounter audio‑sync problems—but the good news is that most of these issues are easy to fix.
This guide explains why audio gets out of sync, how to correct it step by step, and how to optimize your setup so you can enjoy services such as YouTube TV, Philo, FuboTV, StarPrimeMedia, and IBO Player Media with smoother playback and fewer interruptions.
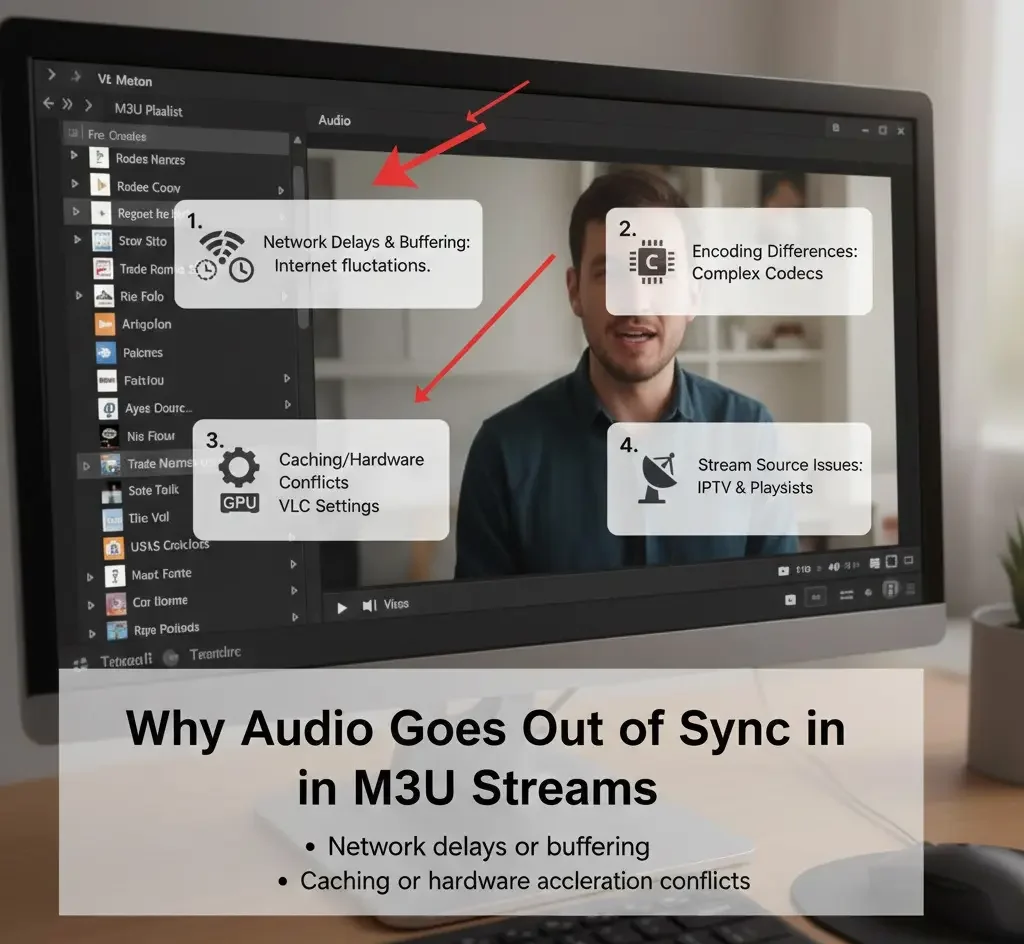
Why Audio Goes Out of Sync in M3U Streams
Before fixing the issue, it helps to understand what causes it. Audio‑sync problems typically happen for one of these reasons:
- Network delays or buffering – Live streams depend on internet stability. Even small fluctuations can shift audio timing.
- Encoding differences – Some streams use codecs that require more processing power.
- Caching or hardware acceleration conflicts – VLC settings sometimes need adjustment for streaming sources.
- Playlist or stream source issues – Not all streams are optimized equally, especially in live IPTV environments.
Knowing this makes troubleshooting much easier.
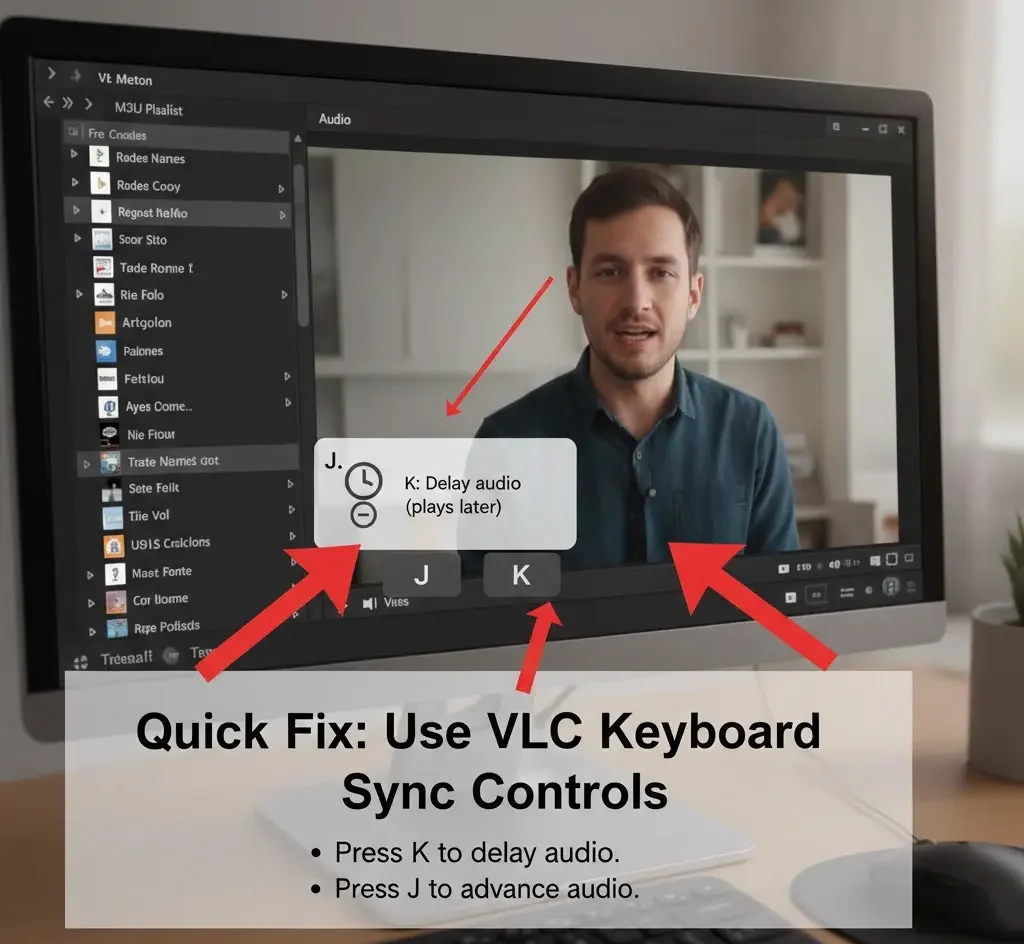
Quick Fix: Use VLC Keyboard Sync Controls
The fastest way to fix audio sync while watching is to use built‑in keyboard shortcuts:
- Press K to delay audio (audio plays later).
- Press J to advance audio (audio plays earlier).
Each press changes timing by small increments, allowing you to match speech with lip movement in seconds. This is ideal for live TV channels or sports streams where you want an immediate fix without stopping playback.
Permanent Fix: Adjust Audio Synchronization Settings
If the same channel or playlist always has a delay, you can apply a more permanent correction:
- Open VLC.
- Go to Tools → Track Synchronization.
- Under Audio/Video, adjust the Audio track synchronization value.
- Test playback and fine‑tune until it matches.
Positive values delay audio; negative values advance it.
Improve Network and Cache Settings
Streaming M3U playlists often benefits from larger caching values. Increasing cache time helps VLC buffer more data and maintain sync.
Steps:
- Open Tools → Preferences.
- Select All under “Show Settings.”
- Navigate to Input / Codecs.
- Increase Network caching (try 1000–3000 ms).
- Save and restart VLC.
This small change can dramatically improve stability for live channels.
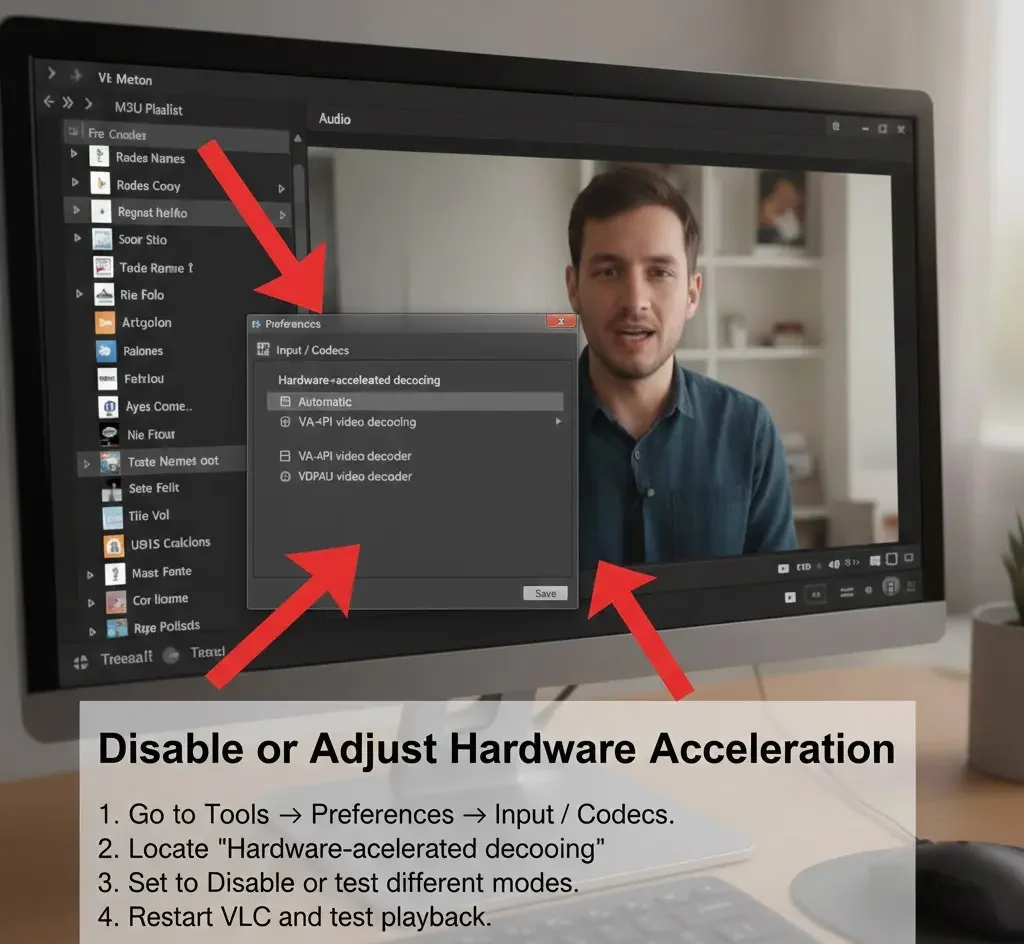
Disable or Adjust Hardware Acceleration
On some systems, hardware decoding can cause sync problems, especially with high‑bitrate streams.
Steps:
- Go to Tools → Preferences → Input / Codecs.
- Locate Hardware-accelerated decoding.
- Set it to Disable or test different modes.
- Restart VLC and test playback.
If your CPU is strong enough, disabling hardware acceleration can produce smoother results.
Update VLC and Codecs
Using an outdated media player is another common cause of sync errors. New releases frequently improve streaming and codec handling.
Always:
- Install the latest VLC version from the official source.
- Restart your system after major updates.
- Retest your playlists.
Regular updates improve compatibility with modern streaming services and formats.
Optimize Your Internet Connection
Even perfect software settings cannot compensate for unstable bandwidth. To reduce sync problems:
- Use a wired Ethernet connection when possible.
- Close background downloads or streaming apps.
- Restart your router periodically.
- Choose a streaming resolution appropriate for your speed.
These simple steps help maintain consistent audio and video timing.
Choosing Reliable Streaming Sources
Audio sync issues sometimes originate from the stream provider rather than the player. High‑quality services invest in better encoding, server capacity, and delivery infrastructure.
When selecting platforms for entertainment, consider providers known for stable feeds, organized channel guides, and responsive support. Services offering legitimate subscriptions and properly licensed content generally deliver more consistent playback quality.
A reliable service combined with proper VLC settings can significantly reduce buffering and synchronization problems.
Enhancing Your Viewing Experience
Once your audio sync is fixed, you can further enhance playback:
1. Customize Video Output
Adjust video output modules in VLC to match your graphics hardware for smoother playback.
2. Use Playlist Organization
Group favorite channels and streams so switching between them is faster and less disruptive.
3. Set Default Audio Tracks
If a stream includes multiple languages, preselect your preferred track to avoid delays.
4. Monitor System Performance
Keep an eye on CPU and memory usage, especially on older devices, to ensure your system isn’t overloaded.
Legal and Responsible Streaming
It’s important to ensure that the content you access is properly licensed and authorized in your region. Legal streaming protects creators, ensures higher reliability, and reduces the risk of service interruptions or poor‑quality feeds.
Whenever possible:
- Use official subscriptions.
- Avoid unverified or pirated streams.
- Follow local regulations regarding media consumption.
Responsible streaming benefits both viewers and the entertainment industry.
Troubleshooting Checklist
If audio is still out of sync, run through this checklist:
- Restart VLC and reload the playlist.
- Test another channel or stream.
- Increase network caching.
- Adjust synchronization manually.
- Update VLC to the latest version.
- Check your internet stability.
Most sync issues are resolved by one of these steps.
Final Thoughts
Audio‑sync problems can be frustrating, but they are usually easy to fix with the right approach. By learning how to adjust synchronization, optimize cache settings, and maintain a stable connection, you can transform your streaming experience from frustrating to seamless.
Modern streaming platforms and IPTV solutions offer tremendous variety—from live sports and news to movies and documentaries. When paired with a properly configured media player, they can deliver smooth, high‑quality entertainment right from your computer or smart TV.
Take a few minutes to apply the tips in this guide, and you’ll spend less time troubleshooting and more time enjoying the content you love.