
Streaming IPTV has become one of the most convenient ways to access live TV, movies, and on-demand content. Star Prime Media is among the leading IPTV providers in the UK, offering reliable playlists and seamless streaming. If you own a NVIDIA Shield Pro or a Firestick 4K Max Gen 2, installing Star Prime Media can transform your TV into a smart entertainment hub.
This guide provides a step-by-step installation process, tips to optimize your experience, and troubleshooting advice to ensure smooth streaming.
Why Star Prime Media on NVIDIA Shield Pro & Firestick 4K Max Gen 2?
Before diving into installation, it’s important to understand why these devices are ideal for IPTV streaming:
NVIDIA Shield Pro
- Powerful Android TV device with 4K HDR support
- Excellent performance for apps like IPTV Smarters and Star Prime Media
- Reliable Wi-Fi and Ethernet options for smooth streaming
Firestick 4K Max Gen 2
- Affordable and compact streaming device
- Supports 4K, HDR, and Dolby Vision
- Easy integration with Alexa for voice control
By combining Star Prime Media with these devices, users gain access to hundreds of live channels, VOD libraries, and seamless HD streaming.
Step 1: Prepare Your Device
NVIDIA Shield Pro
- Ensure your NVIDIA Shield Pro is powered on and connected to the internet.
- Go to Settings → Device Preferences → Security & Restrictions.
- Enable “Unknown Sources” to allow installation of apps outside the Google Play Store.
Firestick 4K Max Gen 2
-
- Turn on Apps from Unknown Sources and ADB Debugging.
- Make sure your Firestick is connected to a stable Wi-Fi network.
Tip: Keeping your device updated ensures compatibility with the latest version of Star Prime Media.
Step 2: Download the Star Prime Media APK
Star Prime Media is not typically available in app stores, so you need to download the APK directly from the official website: Star Prime Media.
- Navigate to the website using your device’s browser.
- Locate the Download APK button for Android TV devices (NVIDIA Shield) or Firestick-compatible APK.
- Save the APK file for installation.
Step 3: Install Star Prime Media on NVIDIA Shield Pro
- Open File Manager or Downloader app on your Shield. If you don’t have Downloader, install it from the Google Play Store.
- Enter the Star Prime Media APK URL or locate the file if downloaded via a PC.
- Select the APK file and choose Install.
- Once installed, click Open to launch the app.
- Enter your Star Prime Media credentials (username, password, and server URL).
Congratulations! Star Prime Media is now ready to stream content on your NVIDIA Shield Pro.
Step 4: Install Star Prime Media on Firestick 4K Max Gen 2
- Install the Downloader app from the Amazon App Store.
- Open Downloader and enter the APK URL from Star Prime Media.
- Click Go to download the APK.
- Once downloaded, select Install.
- After installation, open the app and log in using your Star Prime Media account details.
Tip: On Firestick, you can move the app to the home screen for quick access.
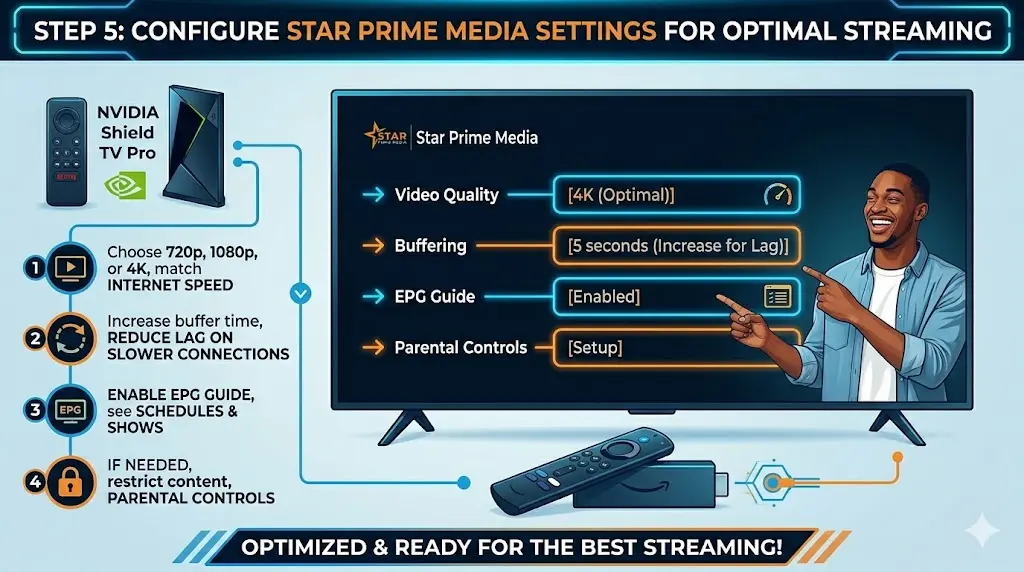
Step 5: Configure Settings for Optimal Streaming
Once installed, optimizing your settings improves performance:
- Video Quality: Choose 720p, 1080p, or 4K depending on your internet speed.
- Buffering Settings: Increase buffer time in Star Prime Media to reduce lag on slower connections.
- EPG Guide: Enable the electronic program guide to see schedules and upcoming shows.
- Parental Controls: If needed, restrict access to certain channels.
Step 6: Troubleshooting Common Issues
Even after installation, some users may face issues. Here’s how to resolve them:
1. App Won’t Launch
- Clear cache via Settings → Apps → Star Prime Media → Clear Cache.
- Restart your device.
2. Channels Not Loading
- Ensure your subscription is active and the M3U link is correct.
- Check your internet connection or try using a wired Ethernet connection for NVIDIA Shield.
3. Buffering or Lag
- Reduce video resolution for slower networks.
- Enable Hardware Acceleration in the app settings.
4. Login Issues
- Re-enter credentials carefully; avoid extra spaces.
- Contact Star Prime Media support if the problem persists.
Step 7: Tips for the Best Viewing Experience
- Use Ethernet if possible: Wired connections are more stable than Wi-Fi.
- Regular Updates: Keep both your device firmware and the Star Prime Media app updated.
- Limit Background Apps: Close unused apps to free memory for smoother streaming.
- External Storage: Use microSD or USB storage to save recordings or cache if supported.
Benefits of Using Star Prime Media on NVIDIA Shield Pro & Firestick 4K Max Gen 2
- High-Quality Streaming: 1080p and 4K channels with minimal buffering.
- Wide Compatibility: Works with Android TV, Firestick, and other Smart TVs.
- User-Friendly Interface: Easy to navigate on both remote and touch input devices.
- Cost-Effective: Reduces reliance on expensive cable subscriptions while offering premium content.
Conclusion
Installing Star Prime Media on NVIDIA Shield Pro or Firestick 4K Max Gen 2 is straightforward if you follow the steps above. By ensuring proper setup, entering credentials correctly, and optimizing settings, you can enjoy hundreds of live channels and on-demand content in high quality.
For official downloads, latest APKs, and subscription plans, visit the official Star Prime Media website: https://starprimemedia.com.
With this setup, your streaming experience will be smooth, fast, and fully customizable—bringing premium IPTV entertainment right to your TV.